Thursday, July 14, 2011

Wish BIG!

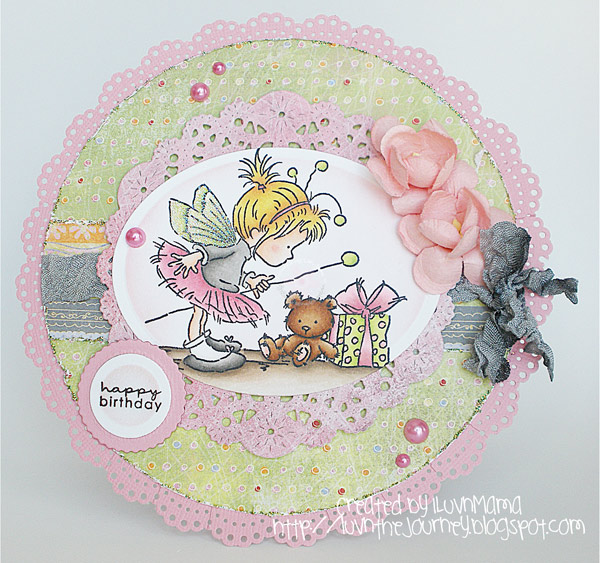
Hey, I'm back with a 'just-for-fun' project.  Today, I've used Mei Li from the new Sister Stamps, LLC.  She's just the cutest little thing don't ya think?  :)   Here is a card box that I created.  I followed the instructions from Beate Johns {HERE}.   The technique that I really wanted to try was making clouds for the background. My sweet friends Amy and Alice both did tutorials on how they make a cloud background.  Click {HERE} for Amy's tutorial & click {HERE} for Alice's one.  (Leanne, I finally did it!)


Here's a close up of Mei Li.  I paper pieced the top of her outfit and colored her pants with copics.  Can you believe this is an origami paper?  I had a pack of origami paper in my stash and luv'd the print, thus using it.  Might as well, it'll was there collecting dust.   


Mei Li is adhered to a band that wraps around the card box.  See how spacious the card box is when you open it up?  You can add some TY cards, a gift card, a small RAK, whatever!  I think I'm gonna make more of these in the future.


Well, that's it for me.  I'm trying to work on some other stuff, hopefully I'll be able to get them done and posted here.  Thanks for stoppin' by today!  :)

Wednesday, June 15, 2011

With Sympathy . . .

Are you all doing well on this Wednesday?  I wanted to post this today as I will be attending a funeral service for my former boss's (Mrs. Y) daughter, who passed away at the age of 39.  She was an only child and leaves behind a daughter of her own.  Mrs. Y had also lost her husband a couple years back.  I am saddened and can't imagine the grief Mrs. Y is feeling at this time. 

Here is a card that I made.  No coloring, just a simple card.  I used PTI and KaiserCraft (Script Texture) stamps inked in Pumice Stone and Tattered Rose.  Everything down to the butterflies were distressed in Antique Linen. 


A close-up . . .


It's never easy to go to a funeral service.  I just pray for peace and comfort during this time for Mrs. Y and the extended family.

*********

On a side note, have you seen my new watermark and signature?  :)  I luv them both . . . they were designed by Ann Vento of Raindrop Echo Designs.  She recently had her 2nd Blogaversary with a giveaway every single day!  How cool is that?  Ann was so generous and I was a recipient of not 1, but 2 giveaway days!  Woohoo!  :)  I receive 2 stamp sets (Circle Postmarks) and the other was my wonderful watermark and signature.  Thanks again Ann!  You are sooooo sweet!

Thursday, April 28, 2011

I {HEART} My Mom!

WARNING:  THIS WILL BE A LENGTHY POST DUE TO THE AMOUNT OF PICTURES TAKEN & ME JABBERING.  :)

*****************

TGIF . . . Welcome to Farm Fresh Friday over at TGF Farm Fresh Challenge Blog.  Today I'll be sharing with you my creation - - - I've made a purse and a matching card to go with it.  We all have a mom in our lives, whether it's our biological mom, MIL, old family friend or neighbor.  This week for Farm Fresh Friday, we want you to make a card or project to honor that special mom in your life.

Here's my purse and card. 


Let's talk about this card . . . it's called the Magic Card.  I saw a card while blog surfing and fell in luv with it.  It was delicate looking and spoke volumes to me.  Yes, had to try it out.  I found it {HERE}.  If you look good, I altered 2 TGF images - - WS Stella's head and Flirty Anya's body.  I suppose she's now called a Flirty Stella.  :)

Flirty Stella stands out against that background don't ya think? Well, that background is a new set called SPLOTCHY.  You'll be able to purchase this set of 2 splotchy images on May 1st!  I sponged Victorian Velvet Distress Ink while still in the Circle Die and then stamped the Splotchy stamp with the same Distress Ink.  For more inspiration on using this SPLOTCHY set, check out the Splendid Stamping with TGF to see how the Design Team utilized this set.


Here's what the card looks like when you flip the cover open.  Once again, I used Splotchy around the sentiment. 


Now here is my purse.  I saw a purse that I wanted to try on this blog {HERE}.  The measurements were in cm, not in inches.  If you're like me, I just improvise and make up my own measurements.  In this case, I had to because I used my Heart To Heart Lace Doily Die to cut out the heart shape on thin coasters.  From there, I played with the measurements.

This is the front of the purse.


This is a picture of the purse opened up.  Sorry, I had to lay it down to keep the purse open.  It can definitely hold some treats or something special. 


The FFF challenges runs until Thursday, entries are due by 12 PM CST.  The winner will receive a free single TGF stamp of choice!  Please upload your challenge cards to TGF Galleria> Farm Fresh Challenges 2011> Farm Fresh Fridays 2011> I heart Mom.

Tuesday, March 29, 2011

One Cute Critter B-day Card . . .

Hey all!  Hope you're having a great day! 

My niece celebrated her 1st birthday on Sunday and I created this card for her.  Do you see that cute critter, well, the bear?  My sweet friend Brenda cut some out for me using her Create A Critter cartridge.  I'm glad she mailed me some because I was scrambling to make a card at the last minute and I pulled out one of these cuties.  Thanks Bren!  You are a lifesaver!

I finally got my new Spellbinders dies and couldn't wait to use them!  The background was embossed with Sizzix Flowers embossing folder and cut with the Labels Nineteen die.  The sentiment is from Lili of the Valley and propped on my new Floral Doily Motifs die.  I'm luvn these new dies!

That's it for me today, but be sure to come back!  Boy, this week is a jam packed week and I'm SOOOOO EXCITED TO SHARE WHAT'S BEEN HAPPENING BEHIND THE SCENES!  Sorry for the yelling, but I can't contain my excitement!  :)

Tuesday, March 1, 2011

Cute as a Button . . .

Hello bloggers!  I'm here to share a card using Cheeky Howdy!  Yee Haw!!!  Ain't she cute as a button?  Thought I'd enter her in Saturday Sketch Challenge over at Club Anya & Friends

 I used the Button Boutique set and the coordinating dies from PTI for this card.  To give the buttons some shine, I added Glossy Accents and finished them off with floss.  I used the Banner Borders die to cut a piece of red felt for the border, tied some seam binding and added a couple more buttons, and voila!


Here's the sketch . . .


Want a closer view to see the shine on the buttons?


Thanks for stoppin' in!  I'll be back to share another card and I do have to share some great BRAKS from very special friends!

Friday, February 25, 2011

Birthday Fairy Wishes . . .

Happy Friday peeps!   I wanted to share this card that I made for my SIL.  She celebrated her birthday on the 20th.  Actually, there were/are many birthdays in which our family celebrated recently.  Here's a list:

FIL - Feb. 17th
SIL - Feb. 20th
DD & an Aunt - Feb. 22nd
Me! - TODAY!!!  :) 
1LuvnDad - Tomorrow, Feb. 26th

Anyway, I created this circle card using Birthday Fairy from Lili of the Valley.   The edge around the actual card was done with my MS Doily Lace Edger Punch.  The doily behind the image is from PTI (luv it!) and the sentiment too is from PTI.  I dyed seam binding in Tim Holtz Black Soot.  Lastly, the DP is from BasicGrey Sugar Rush paper pad.


I colored the image with copics and distressed the background while still in the die with Spun Sugar.  I also distressed the edges of the DP with my Tim Holtz Distressing Tool & added Lime Green Stickles to the distressed parts.


A closer look . . .


I'm gonna submit this to a few challenges for fun.  What the heck right?  :) 

Well, I just wanted to take this time to say thank you to those of you (you know who you are) who emailed me or left birthday wishes on my previous post.  I adore each and everyone of you . . . thank you from the bottom of my heart and for continuing to stop in to view my itty bitty blog.  :)

CCEE1108 - Distressing - inks & tools


Wednesday, February 23, 2011

Just Because . . .

Happy mid-week bloggers! 

Well, I did it!  I used all 3 Miss Anya's in the TGF Miss Anya Hats Off set.  I just luv this sophisticated chic!  Then again, I luv them all!  :) 

Miss Anya is sitting in front of some really sweet DP, Imaginisce Garden Party Collection.  I used my Labels 12 and embossed the DP with Cuttlebug's Textile.  Then, distressed the raised part with Tim Holtz Tea Dye.  Do you likey the doily?  It's from PTI's February Release . . . I couldn't wait to use the doily die.  The sentiment is also from PTI's Simple Sentiments set.  Lastly, the flowers were cut using C.C. Designs Tag It set. 


Here's a close-up . . .


Thought I'd enter a couple of challenges, "Just Because".  LOL!  :)


Fresh Farm Friday (FFF) - Terrifically Texturized - 2 to 3 different textures on project - - - I did dry embossing (distressed with Tea Dye on the embossed part) and added Glossy Accents to Miss Anya's shoes.

That's it for me . . . I have another card to share real soon!  I'm really trying to ink up some stamps that have never been used.  Thinking, it's about time I do!  Always buying and never enough time to use what I buy.  Thanks for stoppin' in!

Monday, February 14, 2011

Happy Valentine's Day!

Happy Valentine's Day people!  Just wanted to share some Valentine's Treat Box Cards that I made.  I made 8 of these treat box cards for the secretaries at my hubby's office and for my son's teachers.  You can find the tutorial on these boxes on Splitcoaststampers {HERE}, but I changed the dimensions on my box cards. 


Four Heart shaped Nestle Crunch was added to the box.   


Here's the tag . . . I used my Tag Sale #3 from PTI (my hubby and my son wrote a message on the back of the tag).  The sentiment is from Paper Pretties Sealed With a Kiss set.  And again, I'm using the Bo Bunny's Crazy Love Fudge and Flowers paper.  You are probably sick of seeing me use this paper, but I just luv the color combo and I bought so much of it that I want to use it up.  I'm gonna have to bore you again with another project using this same DP.  Sorry.  :)


Oh remember I had an addiction for dyeing seam binding?  Check this out . . .

I told myself I wouldn't go there and try dyeing seam binding, but my urges were too strong.  Here is a batch using Antique Linen, Tea Dye, Vintage Photo, and Walnut Stain Tim Holtz Distress Inks.  The Walnut Stain came out gross -- I didn't wipe my work area good enough so some of the Black Soot Ink got into the dyeing process.


This is a batch using Tattered Rose, Worn Lipstick, Fire Brick, and Black Soot.


And lastly, this colorful batch is Spiced Marmalade, Mustard Seed, Shabby Shutters, Milled Lavender and Tumbled Glass.  There are many tutorials out there especially on YouTube on how to dye seam binding.   So there you have it!


 Well, thanks for stoppin' in.  Wishing you a luv-ly {HEART} Day!

Tuesday, February 1, 2011

Sweet & Toxic little Lady

Hey all!  OMGosh!  I can't believe I actually got this done!  I saw that TGF was having their CHA Relay.  They say it's NOT a race, but it really was!  I did the HOP along on the DT's blogs and thought that's all I'll do to try and win the February release . . . and let me say that THEY ARE SUCH BEAUTIES!!!  But then, as I hopped along, I had some inspiration and the hop was so much fun trying to find TEN ITEMS to use on your card if you decided to participate {hey, another way to win the release!}.  With that, I finished my card using the Sweet & Toxic set.  I suck to 2 colors and that was sort of a relief for me since it takes me so long to get anything done these days.  The sentiment is part TGF and part PTI. 

If you plan on entering, you have to hurry up . . . time is a ticking!  The contest is only for a day!  :)  Thanks for coming by and I'm off!

Wednesday, January 26, 2011

I Have You In My Heart . . .

Hi all!  Just wanted to share this cutie, Darling Marci.  She is one of the new line of Marci's at La La Land Crafts.  I'm slowly trying to create some cards and projects and let me tell you, it sure is a  . . . s-l-o-w . . . process. 


Here I used my Martha Stewart border punch and the DP is also from Martha Stewart called Key and Heart Mat Pad.  The sentiment is from Hero Arts.  I wanted to enter my card in a sketch challenge over at Sketches by Carly #21.  This is the sketch.


A close-up of Darling Marci . . .


Well, that's it for now.  I have some tags I want to share later.  Ta-ta!

Saturday, January 22, 2011

Make A Wish

Happy Saturday!  I couldn't resist inking up my Lili of the Valley stamp called Dandelion Clock.  This girlie is one of the new releases and I just had to have her {had to get a few others as well}!  

I followed the sketch for the LOTV Challenge going on right now - Sketch #81 by Dawny P . . . it's been ages since I entered any challenges.  The papers are from the Wisteria paper pad by BasicGrey and the sentiment is from an old Stampin' Up! set.  The edges of the papers were distressed using Antique Linen and sponged the area around the image and the sentiment with Tumbled Glass. 


Here's a closer look . . . I added some glitter to the dandelions and to the wings.  The roses were also glittered up.  I'm entering Flutter By Wednesday's Challenge #138 too.  Since my girlie has wings, I think she qualifies.


So there you have it . . . enjoy your weekend and thanks for stoppin' in!  :)

Friday, January 21, 2011

With Love . . .

Hey all!  OMGoodness . . . can you believe that I was so silent for such a long time and this week I've been posting like heck!  :)  I just had those pictures on my computer and never got to editing and posting. 

La-La Land Crafts is going to CHA and Irina has been hard at work getting ready for it.  Boy, if you haven't seen the new Marci's and Luka's, you're really missing out!  Since being on a sabbatical of sorts, I couldn't resist myself and had to color this cutie . . . SWEETHEART MARCI!


When I saw her, I fell in "luv" with this image.  I've got her surrounded by Bo Bunny Crazy Love Collection papers.  I added a couple of heart pins and distressed the edges of the papers.  If you look carefully, you can see the shine of the strung hearts . . . Glossy Accents is the trick!  :)


This is the inside of the card.  I used a sentiment from Paper Pretties called Sealed With a Kiss.  The sentiment actually reads, "I only have eyes for you!", but I wiped away where the 'eyes' part was and instead, added a punched out heart.  Now it reads, "I only have {heart} for you!".

That's it for me!  I'll be back soon to share another card I've been working on.  Stay tuned!

Tuesday, January 18, 2011

Birthday Suprise Pop Up Card

I don't really like surprises, but I sure like to surprise others!  I created this Surprise Pop Up Card using Birthday Anya for my cousin's daughter who recently celebrated her 3rd birthday.  I made one of these cards in the past and wanted to make one again using the tutorial by Beate Johns. Click {HERE} to the see tutorial.  Pretty much CASEd her card . . . thanks for the inspiration!  :)


 When you pull the tab up, a sentiment is revealed on the tag portion and the card. 

Here's Birthday Anya!  I added some stickles to her headband and the frosting on the cake & distressed around Birthday Anya with Tim Holtz Spun Sugar Distress Ink.


This is the inside of the card.  I stamped and cut out 3 cake images from the Stampin' Up! set called Birthday Bakery.  The sentiments used for the entire card are from Stampin' Up! and Hero Arts.


Thanks for letting me share!  You don't wanna miss out on my next post . . . let's just say, I had more than my fill of CAKE!  ;)

Monday, January 17, 2011

Another Bugaboo card

Here's a quick post today.   Like I mentioned in my previous post, I had colored up some images a while ago before baby Asa came into our lives.  I was able to make a card using this image . . .


This digi cutie actually holds some balloons but I decided to cut them out and let the balloons fly away.  :)  I just wanted that girly!  When you flip the top portion of the card over, here's what it looks like.  Similar to a gatefold card.


Here's the card opened up.  The sentiment on the outside of the card is from Hero Arts and the sentiment on the inside is from Stampin' Up!


Thanks for stoppin' in today.  I do have more to share . . . really!  :)

Sunday, January 16, 2011

Monkeyin' Around . . .

Hi there!  Maybe I should re-introduce myself . . . 1LuvnMama here!  :)  hee, hee!  It's been way too long being away from my blog.  All is well on the homefront, just taking care of business and enjoying my little "boss" who is 2 months already.  Time flies by so fast and I sure don't want to miss out on any milestones in my kids lives!

My poor craft table has been neglected too and I do admit, I'm missing the time to craft.  I have some cards and projects to share but just don't have the time to edit my photos and get to my blog.  Here is a quicky.  I sorta cheated here . . . I had this image colored up (Bugaboo) a while ago and put together a card for a very special friend.  :) 


Here's a closer look . . . I used Glossy Accents for the balloon.  I colored the area around his neck green because I thought it was a scarf.  Quick question.  Is it a scarf?  Maybe it's just me, but I couldn't tell or decide whether it was a scarf or part of the monkey's arm/hand.  If anyone can tell me that would be great!  :)


Well, I have another card to show you next time I pop back on the blog.  It's another Bugaboo image which I pre-colored.  I suppose the Lord knew I needed to color some images in advance for times such as these (when I don't really have the time)!  :)  Have a great Sunday!

Friday, October 29, 2010

A Short Term Farewell and a Votive . . .

Hey Gang!  Don't let the title of this post scare you.  Although this is my last post for La-La Land Crafts Blog, I'll be back at some point.  My farewell is for a short time since I'm awaiting the arrival of my little guy.  Like I said, I wanted to go out with a BANG with this post.  I hope you'll stick with me because I have lots of photo shots to share with you!

For my project, I made a Votive Card using a tea light.  I saw this on Splitcoaststampers some time ago and thought I'd give it a try.  I made this Votive Card two-sided . . . one in a Halloween theme and the other in a Christmas theme.

Here's the  Halloween theme featuring Pumpkin Marci and Witch Marci


Got Candy? 


Witch Marci is just flying by to say "HI"!


Now here's the Christmas themed side featuring Santa Marci, Caroling Luka, and Winter Marci.


Ho, Ho, Ho . . . Merry Christmas!


Walking in a Winter Wonderland!


This is the top view looking down on the tea light.


I wanted to show what the Votive Card looks like with the lights dimmed and the tea light on. 


How did I make this card?  Here's the dimensions . . .

I cut a piece of CS at 8-1/2" x 12".  On the 8-1/2" side, I scored the CS in half at 4-1/4".  Turn the CS around to the 12" side and score at 3", 6", and 9".  Using an Exacto knife, cut on the score line from the 3" mark to 9" mark.  This will give you an opening for the tea light.  Decorate as you wish and adhere the two ends shut.  You can make the dimensions any size you want, it's totally up to you.  I hope my directions make sense . . . I'm not good at tutorials.  You can actually fold up this Votive Card and tie a ribbon around it to give as a gift. 

Well, I hope you enjoyed this project as much as I enjoyed making it.  I know I'll keep this out in the next couple of months.  Be sure to visit the Online Store to get your Marci & Luka stamps.  They are perfect for the upcoming holidays!  Thanks again for all your support and I'll definitely keep you updated on the "boss"!